- Mark as New
- Bookmark
- Subscribe
- Mute
- Subscribe to RSS Feed
- Permalink
- Report Inappropriate Content
Hola buenas Tengo una Placa madre " Intel® DH55TC " Y necesito ayuda no encuentro si esta placa madre tiene compatibilidad con una targeta grafica Que es la " Radeon RX 460 Graphics Sapphire 4gb " Porfavor alguien que me ayude.
Link Copied
- Mark as New
- Bookmark
- Subscribe
- Mute
- Subscribe to RSS Feed
- Permalink
- Report Inappropriate Content
PEDRO4, Thank you for posting in the Intel® Communities Support.
Solo para informarle que solo brindamos soporte en idioma inglés y actualmente estamos utilizando una herramienta de traducción.
In reference to this scenario, it is important to mention that the Intel® Desktop Board DH55TC is under the status of End Of Interactive Support / Discontinued as you can verify in the link below:
https://ark.intel.com/content/www/us/en/ark/products/42408/intel-desktop-board-dh55tc.html
So, Intel® technical support will no longer be provided for this kind of product, but perhaps fellow community members have the knowledge to jump in and help. You may also find the Discontinued Products Website helpful to address your request:
https://www.intel.com/content/www/us/en/support/discontinued-products.html
Regards,
Albert R.
Intel Customer Support Technician
- Mark as New
- Bookmark
- Subscribe
- Mute
- Subscribe to RSS Feed
- Permalink
- Report Inappropriate Content
Hayla bios Dosyasını bulamadım ve Anakart Format Atma Menüsüne Bir Türlü Geçmiyor Bİ Ekranda Takılıp kalıyor Yardımcı Olursanız Sevinirim
- Mark as New
- Bookmark
- Subscribe
- Mute
- Subscribe to RSS Feed
- Permalink
- Report Inappropriate Content
Start a new thread for yourself with FULL INFORMATION.
Doc (not an Intel employee or contractor)
[Intel, like it or not, NUCs did exist]
- Mark as New
- Bookmark
- Subscribe
- Mute
- Subscribe to RSS Feed
- Permalink
- Report Inappropriate Content
Unfortunately, the older Intel Desktop Boards (especially ones that are this old) have poor compatibility with more-modern graphics cards - and especially AMD graphics card; NVIDIA graphics cards do a lot better (though still some issues).
I cannot say for sure that you will have a problem using this card. One suggestion I have is to enable UEFI support in the BIOS.
...S
- Mark as New
- Bookmark
- Subscribe
- Mute
- Subscribe to RSS Feed
- Permalink
- Report Inappropriate Content
The final BIOS file is in the attached ZIP file. You should install it using BIOS Recovery.
To help you better, here are my step-by-step instructions for BIOS Recovery:
- NOTE: Read these instructions completely before starting. Follow all instructions EXACTLY.
- On some other Windows-based PC, download the .BIO file for the BIOS release you wish to install.
- Insert a 32GB or smaller (the smaller the better) USB 2.0 flash drive into the PC. Do not use USB 3.0 flash drives (most are not compatible).
- Format this USB flash drive using the Windows Format applet. Specify to install the FAT32 file system (Important: NOT vFAT, NOT exFAT; FAT32 only). You must also specify that the Quick Format option be Disabled (unchecked).
- NOTE: If FAT32 is not offered as a choice by the Format applet, your flash drive is too big; use another.
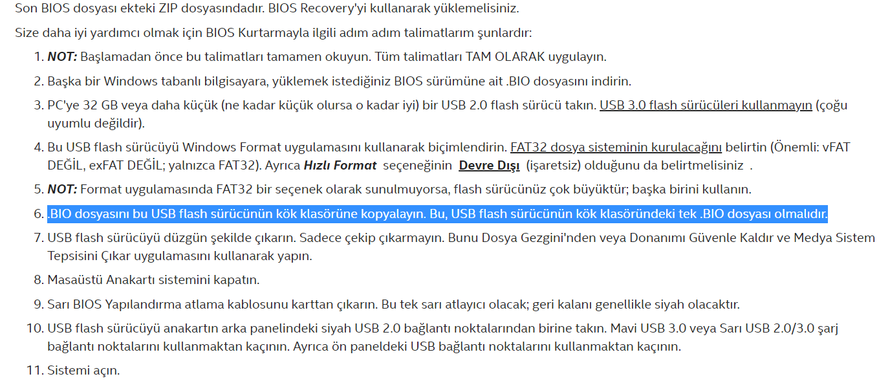
- Copy the .BIO file into the root folder of this USB flash drive. This should be the only .BIO file in the root folder of the USB flash drive.
- Properly eject the USB flash drive. Do not just yank it out. Do this from File Explorer or using the Safely Remove Hardware and Eject Media System Tray applet.
- Power off the Desktop Board system.
- Remove the yellow BIOS Configuration jumper from the board. It will be the only yellow jumper; the rest will usually be black.
- Plug the USB flash drive into one of the black USB 2.0 ports on the back panel of the board. Avoid using blue USB 3.0 or Yellow USB 2.0/3.0 charging ports. Also avoid using front panel USB ports.
- Power on the system.
- The BIOS Recovery process should start automatically. You should see a progress report on your main monitor.
- NOTE: If you do not see a progress report displayed on a monitor, do not power off the system for at least 15 minutes. While it is rare, it is possible for the process to proceed without an onscreen display; you must give it ample time to complete, just in case.
- When the BIOS Recovery process is complete, you will be asked to power off the system. Do so then.
- Restore the yellow BIOS Configuration jumper to the pins it was on previously. This should be across pins 1 and 2 of this (three pin) header.
- Remove the USB flash drive from the back panel of the board.
- Power on the board.
- Immediately begin pressing the F2 key, over and over (approx. once per second) until you see a BIOS Setup (or Visual BIOS) screen displayed.
- Verify, using the BIOS version string, that the BIOS installed properly. Stop if it isn't.
- Press the F9 key (followed by the Y key) to reset of the BIOS configuration.
- Press the F10 key (followed by the Y key) to save the BIOS Configuration and exit BIOS Setup.
- Once screen is cleared (goes black), begin pressing the F2 key, over and over, until you see the BIOS Setup screen displayed.
- Make any changes to the BIOS configuration that you desire (for example, disabling NUMLOCK) or that you require (for example, setting Boot Order, enabling UEFI, etc.).
- Press the F10 key (followed by the Y key) to save the BIOS Configuration and exit BIOS Setup.
- Test.
Here are some additional thoughts:
- If BIOS Recovery will not start, try using a different USB port. If no other option, you can try using front panel USB ports.
- If switching USB ports didn't work, try using a different USB flash drive. Remember that all USB flash drives must be reformatted at least once using the process described in Step 4 above.
- As always, it is helpful to use a USB flash drive that has an access LED so that you can visually see if it is being accessed.
- If you are seeing USB flash drive being accessed but BIOS Recovery does not start, a common cause is compatibility with the memory present. The BIOS Recovery engine, as it is with USB 3.0 flash drives, can be very picky with regards to memory compatibility. Try removing all but one DIMM.
Hope this helps,
...S
- Mark as New
- Bookmark
- Subscribe
- Mute
- Subscribe to RSS Feed
- Permalink
- Report Inappropriate Content
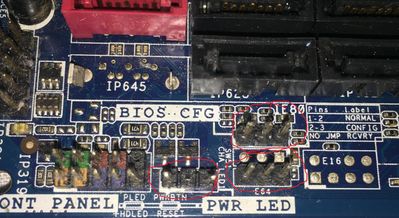
Bu Resimler 3 Tane Bios Jumper Giriş Yeri Var Bunların 3'ün dede 1 'er Jumper mı Takılacak Yoksa Sadece 1 Girişi 1 Tane Jumper'mı Takılacak.
- Mark as New
- Bookmark
- Subscribe
- Mute
- Subscribe to RSS Feed
- Permalink
- Report Inappropriate Content
Bi Takıldığım Yerde Bu Bios Usb Disk'ini Oluştururken Resimdeki Dosayaların İçinden Sadece Kırmızı Yuvarlak İçindeki Dosyayımı Kullanıcaz..
- Mark as New
- Bookmark
- Subscribe
- Mute
- Subscribe to RSS Feed
- Permalink
- Report Inappropriate Content
One jumper will be installed into - or, in the case of BIOS Recovery, removed from - the BIOS Configuration header. Here is your picture with the proper header circled. The circle shows how to place the jumper for various things.
The strange thing here is that there should already have been a jumper on this header connecting pins 1 and 2. Normal operation requires this jumper bein place.
...S
- Subscribe to RSS Feed
- Mark Topic as New
- Mark Topic as Read
- Float this Topic for Current User
- Bookmark
- Subscribe
- Printer Friendly Page


